Tuesday, May 24, 2005

Why Calibrate?

What is the issue?
Let's say you just downloaded a photo from your camera. How does that photo look? Is it very dark? If so, will you "tweak" it in an editor like PhotoShop, to brighten it? Have you considered adjusting the brightness or gamma on your monitor instead of editing the photo itself?

Did you know that "tweaking" with a photo editor actually squashes and stretches the data, ultimately reducing the resolution of the image?


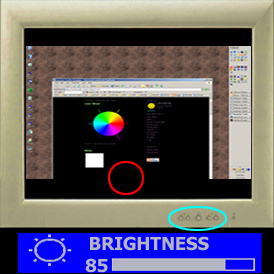
Figure 1: Original Photo.
This photo has not been edited. It will look very dark on a typical, out-of-the-box monitor. Would you adjust your monitor's display settings, or use a photo editor to lighten-up this photo?

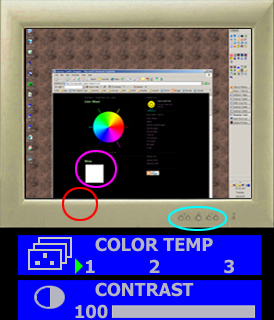
Figure 2: Photo with Chunks of Data Missing because of Levels Tool.
This photo has been "tweaked", to brighten it. Looking at the "levels" window (inset, lower left, Figure 2), you can see the graph of brightness data for the photo. The graph for this edited version has stripes, gaps, and stacking of the data, compared to the smooth, solid black graph in Figure 1. These gaps and stacks show the damage to the data resolution caused by the brightening of the photo.

How does this photo look on someone else's computer?

If you collaberate with a friend to create a websight, what happens if your friend's monitor has the brightness at 100%, while yours is at 80%? Will all of your images be noticably brighter than your friend's? How can you be sure the photos look the same on each other's monitors, whithout looking at both monitors side-by-side?

The answer is, calibration.

What is calibration?

Figuring out how to adjust the monitor settings to give an optimal display can be a real puzzler. A calibration procedure eliminates the guess-work. The procedure is a repeatable, consistant list of steps for using a set of special images to "tune" your display settings. A given image, viewed on two monitors calibrated by the same procedure, will look the same on both monitors. Well, in a perfect world, anyway.

What display settings?

Some video display settings are controlled by real buttons on the monitor itself. These include contrast, brightness, and white temperature.

The rest of the display settings depend on the graphics card installed on your machine and are controlled by software "drivers". The default value for a key video card display setting, "gamma", usually makes images appear too dark. Other video card settings include screen resolution, and refresh rate (which controls flicker).

Gamma?

About the biggest debate in monitor calibration is over how to set the gamma. The rest of the settings are easier to settle on. Gamma more or less sets which gray is 50% on your monitor display.

My advise is, choose a gamma calibration appropriate for what you're trying to do. For example:

- For website development, the best choice is probably the default, gamma = 1, since the majority of the browsing public use the default.

- Photos being prepped for printing should be edited on monitors calibrated to match the appearance of the printouts.

- For a team project, make sure everyone uses the same settings.
- If you look at photos a lot, you may choose to calibrate for the best viewing of unaltered photos.

How does my display look right now?

These images should give you a feel for how much detail you are or are not seeing right now. Don't forget to read the captions.

Monday, May 23, 2005

Calibration Procedure

1. Verify your graphics card driver: make sure it is the current version and appropriate for your card and monitor model.

2. Check basic display setup.

3. Set contrast to 100%.

4. Adjust your black and white.

5. Calibrate your gamma.

6. Inspect the display evaluation images. Read the image captions for key things to look for.

Sunday, May 22, 2005

The Role of the Driver

Your display consists of three basic elements:

1. The monitor: The big "TV" screen you're looking at.

2. The Graphics Card: That card, mounted inside your computer, with a plug or two sticking out the back. Your monitor is plugged into it.

3. The Driver: The driver is the software interface between your monitor and video card. Drivers are upgraded occasionally by the manufacturer, and are provided for free download by both monitor vendors and graphics card vendors.

To get the most out of your hardware (monitor and card), you need the driver that was made for it. A generic driver may work, but a driver made specifically for your monitor and card combination will make the best use of your hardware's features.

What specific hardware do you have?

What's under the hood?

1. Identify the Monitor Make and Model

The monitor manufacturer may not be listed directly on the monitor (e.g the monitor may have "Intergraph" printed on the front, but the manufacturer may be Panasonic). A web search based on the numbers on the back of the monitor and the name listed on the front, with a bit of effort, should turn up the actual make and model of your monitor.

2. Identify the Graphics Card

Right-click on “My Computer” icon, then select “Manage”. Select “System Tools" and look for something like "Device Manager/Display Adapters". The card will be listed. Mine is an "NVIDIA GeForce FX 5900 Ultra"

3. Get the Right Driver

Using the information you just collected about your monitor and graphics card, search online for the current driver that is appropriate for your specific combination. The hardware manufacturer's site is a good place to start.

4. Install It

Access driver information through the "Display Properties" panel: right-click the desktop, select "Properties", then the "Settings" tab. Click "Advanced"; at this point, the menu layout and available features will vary, according to your current driver. Look for a tab or button referring to the monitor and/or driver. After a few clicks, you should be able to find information about your current driver, and how to install a new one.

Follow the steps for installing the new driver. You may need to reboot.

Friday, May 20, 2005

Basic Display Setup

Graphics Card:

Open the "Display Properties" form (right-click the desktop, then select "properties"). Select the “Settings” tab.

a) Set "Color Quality" to 32 bit, or the highest available.

b) Set the "Refresh Frequency" to minimize screen flicker; higher than 60 Hertz is usually prefered. This setting may be located under the "Advanced" button, “Monitor” tab.

c) Set the screen resolution, or "Screen Area". The setting to choose is up to you. Higher resolutions make text and images appear smaller, allowing for more to be viewed at a time, but how good are your eyes? Choose a screen resolution for which Fig. 1 is square; some resolutions are not, causing the display to be "stretched". Pixel Ruler is a handy way to measure things on the screen, if you want to.

Figure 1: A White, 128 x 128 Pixel Square.

Choose a resolution that makes this image a square, not a rectangle.


Monitor:

Control the monitor settings using the buttons and/or dials on your monitor case.

Changing the resolution usually leaves the display squeezed a bit, with unused black borders at the top, bottom, and/or sides. Use the horizontal/vertical control buttons on the monitor to adjust the display area to completely fill the screen.

You can also play with the trapezoid, pincushion, parallelagram, and rotation controls to make the display fit exactly.

Sunday, May 15, 2005

Adjust your Black and White

Setup:
1. Locate the controls(Figure 1, circled in cyan) . Most monitors have real buttons on the front or around the back.

2. Position a 100% black image so that it crosses the bottom of the display (Figure 1, circled in red) .

3. Position a 100% white image, such as Figure 2, on the screen (Figure 1, white image, circled in magenta).


Figure 1: Black and White Calibration Setup.

Typical "Color Temp" and "Contrast" dialogs
are depicted at the bottom.


White Adjustment:
Find the monitor's "color temperature" adjustment. Select the setting which makes Figure 2 look the whitest.


Figure 2: 100% White.

Using the "Color Temp" monitor control, select the "whitest white".


Black Adjustment:
1. Use the "vertical size" display control to "squeeze" the display area of the monitor. This will expose black borders at the top and bottom of the display, like letterboxing on a movie.

2. Set the "brightness" to 100%, and make your room dark. There should be a noticable difference between the black of the screen image, and the black border at the bottom, as shown in the red circle in Figure 3.


Figure 3: Setup for Black Adjustment.

Squeeze the vertical size, and set the brightness to 100%, so the black on the image is brighter than the blank screen at the bottom.


3. With your room still dark, slowly reduce the brightness until you can't see the transition between the black of the image and the black of the border, as depicted in Figure 4.


Figure 4: Brightness Setting.

Looking at the red circle, the black in the image now matches the black of the unused bottom border of the display.


4. Now adjust the vertical size appropriatly again, to fully fill your monitor's display, as shown in Figure 5.

Figure 5: Reset Vertical Size.

Adjust vertical size to match the display size to the screen size.

Friday, May 13, 2005

Gamma Calibration

How to Calibrate Gamma:

  • Select your preferred gamma calibration image from Figure 2. Read section 1, below, if you're not sure which to use.

  • Find the gamma control; see section 2, below, for tips.

  • Turn out the lights, and squint or stand back a few feet from your monitor.

  • Slide the gamma slider until your chosen calibration image looks like the control image (i.e. the centers of the horizontal stripes blend with the ends).

  • Do (or repeat) the Black and White adjustment.

  • Look at the gamma calibration image again afterwards. Adjust it again and repeat the Black and White adjustment, until both are correct.

Figure 1: Control Image

This image has solid horizontal stripes. When you squint or stand back from the calibration images (Figure 2), the one that looks most like this (minimal vertical stripes) represents your current calibration.

40% 45% 50%

55% 60% 65%

70% 75% 80%

Figure 2: Calibration Images.

The % numbers here refer to the brightness of the texel color, as selected in a paint program like PhotoShop.

1. Which gamma should I use (what % brightness)?

  • On a typical (not calibrated) monitor, the 75% image will look the closest to the control image. Most web content will appear as intended at this setting. However, a photograph will appear too dark because of the skew.

  • Using 50% brightness would make full use of the available color range of the monitor, and may arguably be the best setting. However, most web content and some desktop imagery will be very bright.

  • I personally use the 60% image, which splits the difference. Web content is a bit bright, photos are a bit dark.

  • If you have a different goal in mind, such as printing photos out, then you may want to calibrate your display to look as close as possible to your printout.

2. Find the gamma control

  • Open the “Display Properties” form (right-click the desktop, then select "properties"), then select the “Settings” tab. The layout of this form will vary according to the graphics card type. Look for an “Advenced” button, and then a “Color Correction” tab. Color Correction may be located in a sub-menu of a special graphics card tab. Once found, look for provisions for making the new settings the default value. On a dual-monitor setup, gamma is adjusted separately for each monitor.
  • Figure 1: Display Properties Panel.

    This is a screenshot of my Display Properties panel, opened up to show the gamma controls. The panel shown here is specific to my graphics card type, and may look considerably different for a different card.


  • Can't find the gamma control? Then use the Adobe gamma calibration utility, assuming it was installed when an Adobe application was installed on the machine. Double-click “Adobe Gamma.cpl”, located in control panels, or in a directory such as: Program Files\Common Files\Adobe\Calibration. Use the Adobe application to adjust the gamma, but use your selected gamma % image, rather than the image provided by the utility.

Figure 2: Screenshot of Adobe Gamma Utility.

I have had graphics cards that do not have gamma control, or hide it so completely that it may not exist. On that machine, I used Adobe's gamma control panel, pictured here.

3. How does that Gamma image work?

  • The outer portion of the gray stripes is painted solid gray. On the image labeled "50%", the gray is of 50% brightness, which is rgb value 128, 128, 128. The inner portion is made of alternating 1 texel stripes of pure black and white. When viewed at a distance, this box appears to be grey because your eye will blend the black and white pixels. Adjusting the gamma using the 50% image sets 50% brightness pixels to appear as the midrange brightness of the display.

  • The colored stripes are set up similarly to the gray: The solid areas are full saturation red, green, and blue, but set at a given % brightness. The inner area alternates between black and 100% brightness colored texel rows.

Thursday, May 12, 2005

Display Evaluation Images

Figures 1 and 2, below, will display on your monitor as described in the captions, if your monitor is fully calibrated with a gamma tuned for 59% gray. If the color wheel is skewed, or the numbers aren't visible, you are losing resolution in your display; you are not seeing all of the detail available in your images.


Figure 1: Color Wheel.

If your display is balanced, there will appear to be about the same amount of red, blue, and green on this wheel as there is yellow, magenta, and cyan. The colors will also blend smoothly.


Figure 2: Gradients and Number Displays.

If your display is balanced, the left gradient will blend evenly from black to white, and the right gradient will have discreet blocks of shades of gray. Above each blue number, a very faint black or white number should be at least barely visible, in a dark room, if you look closely. The number values indicate % brightness.