How to Calibrate Gamma:
- Select your preferred gamma calibration image from Figure 2. Read section 1, below, if you're not sure which to use.
- Find the gamma control; see section 2, below, for tips.
- Turn out the lights, and squint or stand back a few feet from your monitor.
- Slide the gamma slider until your chosen calibration image looks like the control image (i.e. the centers of the horizontal stripes blend with the ends).
- Do (or repeat) the Black and White adjustment.
- Look at the gamma calibration image again afterwards. Adjust it again and repeat the Black and White adjustment, until both are correct.

Figure 1: Control Image |
This image has solid horizontal stripes. When you squint or stand back from the calibration images (Figure 2), the one that looks most like this (minimal vertical stripes) represents your current calibration. |

| 40% | 45% | 50% |

| 55% | 60% | 65% |

| 70% | 75% | 80% |
Figure 2: Calibration Images. |
The % numbers here refer to the brightness of the texel color, as selected in a paint program like PhotoShop. |
1. Which gamma should I use (what % brightness)?
- On a typical (not calibrated) monitor, the 75% image will look the closest to the control image. Most web content will appear as intended at this setting. However, a photograph will appear too dark because of the skew.
- Using 50% brightness would make full use of the available color range of the monitor, and may arguably be the best setting. However, most web content and some desktop imagery will be very bright.
- I personally use the 60% image, which splits the difference. Web content is a bit bright, photos are a bit dark.
- If you have a different goal in mind, such as printing photos out, then you may want to calibrate your display to look as close as possible to your printout.
2. Find the gamma control
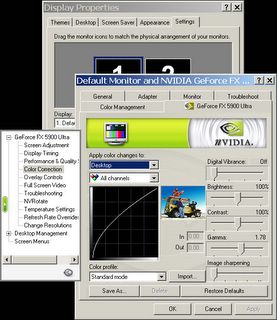
- Open the “Display Properties” form (right-click the desktop, then select "properties"), then select the “Settings” tab. The layout of this form will vary according to the graphics card type. Look for an “Advenced” button, and then a “Color Correction” tab. Color Correction may be located in a sub-menu of a special graphics card tab. Once found, look for provisions for making the new settings the default value. On a dual-monitor setup, gamma is adjusted separately for each monitor.
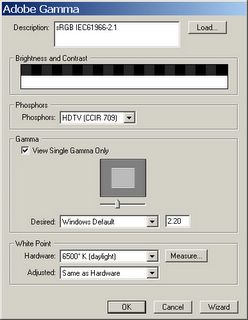
- Can't find the gamma control? Then use the Adobe gamma calibration utility, assuming it was installed when an Adobe application was installed on the machine. Double-click “Adobe Gamma.cpl”, located in control panels, or in a directory such as: Program Files\Common Files\Adobe\Calibration. Use the Adobe application to adjust the gamma, but use your selected gamma % image, rather than the image provided by the utility.
Figure 1: Display Properties Panel. |
This is a screenshot of my Display Properties panel, opened up to show the gamma controls. The panel shown here is specific to my graphics card type, and may look considerably different for a different card. |
Figure 2: Screenshot of Adobe Gamma Utility. |
I have had graphics cards that do not have gamma control, or hide it so completely that it may not exist. On that machine, I used Adobe's gamma control panel, pictured here. |
3. How does that Gamma image work?
- The outer portion of the gray stripes is painted solid gray. On the image labeled "50%", the gray is of 50% brightness, which is rgb value 128, 128, 128. The inner portion is made of alternating 1 texel stripes of pure black and white. When viewed at a distance, this box appears to be grey because your eye will blend the black and white pixels. Adjusting the gamma using the 50% image sets 50% brightness pixels to appear as the midrange brightness of the display.
- The colored stripes are set up similarly to the gray: The solid areas are full saturation red, green, and blue, but set at a given % brightness. The inner area alternates between black and 100% brightness colored texel rows.


No comments:
Post a Comment